#How to setup FTP Server
Explore tagged Tumblr posts
Visit Tumblr Blog
Explore Tumblr blogs with no restrictions, modern design and the best experience.
Last Seen Tumblr Blogs


Fun Fact
Mobile Tumblr US users spend an average of 4.04 minutes per session on the app.
Text
How To Set Up Socks5 Proxy List in Wingate.me?
What Is Private Proxy Wingate.me?

Wingate.me is a private proxy service that delivers secure managed internet access across your entire network and all your online activities. It caters to a range of requirements, from small networks to large enterprises. Known for its high-quality private proxies, particularly in the Russian region, Wingate.me has carved a niche for itself as a powerful online platform.
Supporting for Internet hosting ensures that the WinGate Proxy Server is compatible with all browsers, SSL, FTP, streaming audio and video, DirectPlay Internet gaming, etc. Socks5 proxy list wingate.me provides clients with a safe, anonymous, and unrestricted internet browsing experience. They shield users from data collection and facilitate access to otherwise blocked websites.
Types of Private Proxy Wingate.me
It offers a variety of private proxy types, including:
1. SOCKS4 proxy
A versatile proxy for web browsing, file sharing and online gaming, known for its speed and efficiency.
2. SOCKS5 proxy
These proxies support TCP and UDP traffic, making them ideal for online streaming, torrenting, and high-performance tasks.
3. IPv4 proxy
Stable and reliable proxy based on IPv4 protocol, compatible with most websites and services on the Internet.
4. Mix of SOCKS5 and IPv4 proxies
This option combines the advantages of both proxy types, providing flexibility for different tasks.
An Overview Of Wingate.me’s Socks5 Proxy List
Socks5 proxy list wingate.me provides an extensive list of Socks5 proxy servers, ensuring users have access to a broad range of functional and efficient proxies. The list, updated regularly, includes information such as the IP address, port number, country, and the last time the proxy was checked for functionality. This transparency empowers users to make informed decisions when selecting a proxy server.
Get 1GB Proxy Free Trial of Residential Proxies Now!
How To Set Up Wingate.me’s Socks5 Proxy?
Setting up a Socks5 proxy from Wingate.me is straightforward. After selecting a proxy from the list, users can configure their web browsers or applications to use the proxy by entering the provided IP address and port number in the relevant settings. Specific setup instructions may vary depending on the application or browser used. Here are detailed instructions:
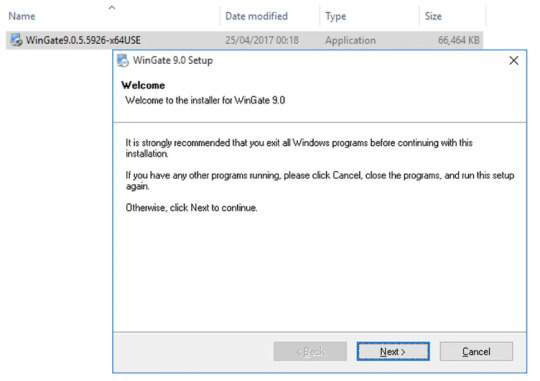
Step 1 Installing Wingate Proxy Server
After downloading the latest package of WinGate Proxy Server, double-click its ‘.exe’ package to start the installation setup wizard of WinGate proxy server. After that, you will be greeted by its welcome page to get started with the installation on your devices. Click on the “Next” button to continue.
Get 1GB Proxy Free Trial of Residential Proxies Now!
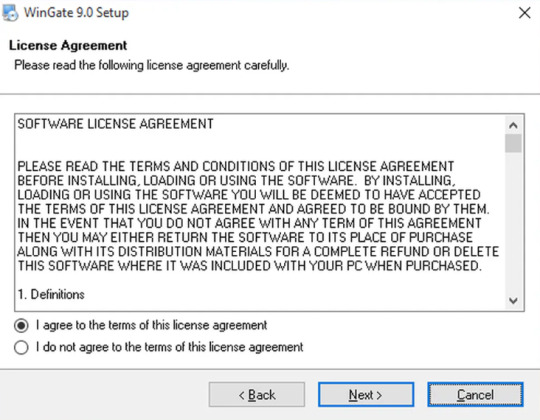
Step 2 License Agreement
You need to read and accept the license agreement before the installation and use of Wingate by choosing the right option as shown.
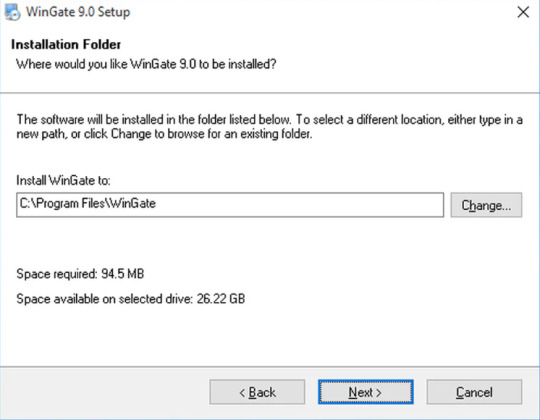
Step 3 Installation Folder
Choose the location on your system, where you like to place the WinGate installation setup.
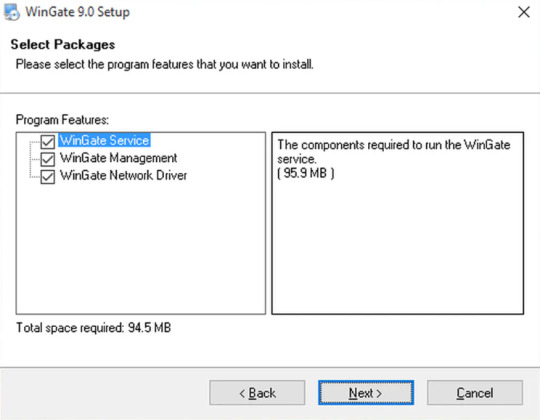
Step 4 Select Packages
You will be asked to choose the program features that you wish to install on your system.
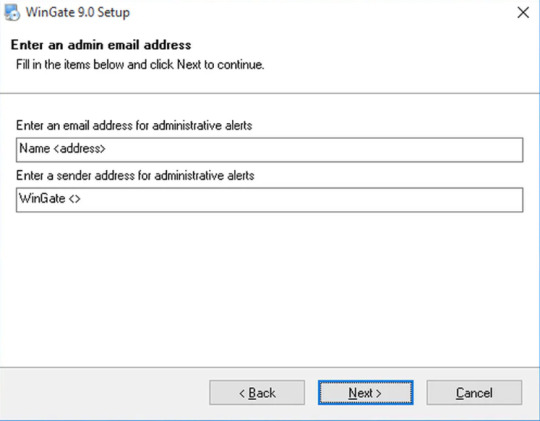
Step 5 Admin Email Address
You should provide your Administrative User Name and Email ID along with the Senders’ address for the administrative alerts.
Step 6 Ready to Install
If you click on the ‘Next’ button, your installation process will start processing files and other selecting configurations. After finishing the installation process of WinGate, click on the ‘Finish’ to exit the installer. Remember to click on the ‘Yes’ to go for system reboot and wait till it is back.

Step 7 Setting Up
After you finish the installation, you can set up Wingate.me’s Socks5 Proxy List now.
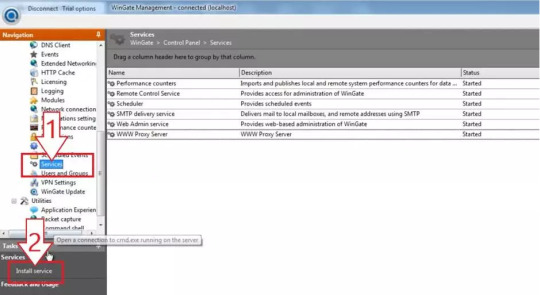
1. You will see a welcome page and a navigation menu on the left with available configuration options. Please focus on setting up the proxy. To do this, select “Services” from the navigation menu, then right-click on the empty space on the right and select Install Service.
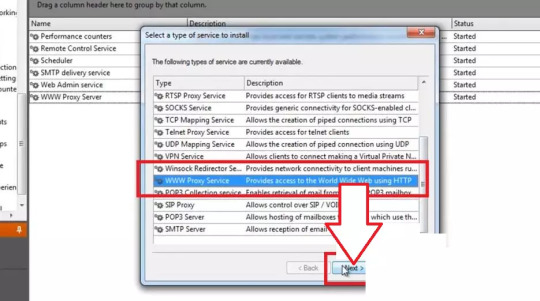
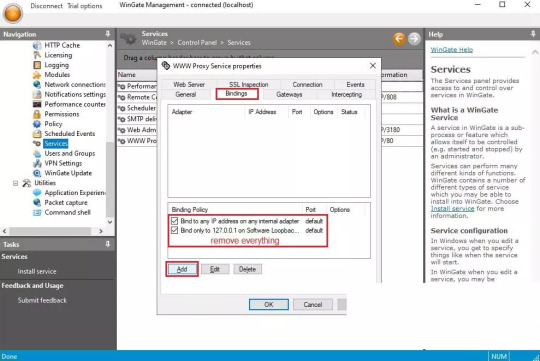
2. The service properties window will appear. Navigate to the Bindings tab. Remove all active bindings and click Add. Select “Any External Adapter” and click “OK” to save your configuration.
3. Now, go to the Connection tab. Check the box next to “Connect through upstream proxy.” Go to the IP Settings dashboard to configure your proxy. Note down the HTTP proxy host, proxy port, proxy username and proxy password of the private proxy you obtained from the website and import this data into WinGate.

By following these steps, you will successfully configure a private proxy using Wingate’s user-friendly interface. This ensures safe, anonymous and efficient internet browsing while protecting your online activity and data.
Get 1GB Proxy Free Trial of Residential Proxies Now!
Conclusion
Wingate.me’s Socks5 proxy list is a powerful tool for anyone seeking to navigate the digital world with anonymity, versatility, and global access. However, like any tool, it should be used responsibly and ethically. As we continue to sail through the data-driven era, tools like Wingate.me’s Socks5 proxy list will undoubtedly play a crucial role in shaping our digital experiences.
For more please read the original article which is from:
#socks5 proxy list wingate.me
#private proxy wingate.me
#buy wingate me private proxy
#proxy for email wingate.me
3 notes
·
View notes
Text
Sponzy Nulled Script 5.8

Download Sponzy Nulled Script – Monetize Your Content Creatively If you're looking for a powerful yet cost-effective solution to launch a creator-support platform, Sponzy Nulled Script is the perfect tool for you. Whether you're building a Patreon-style website or looking to monetize content through subscriptions and donations, this script is a game-changer. Enjoy full access to premium features without any licensing restrictions. Get the latest version for free right here and empower your online journey today! What Is Sponzy Nulled Script? Sponzy Nulled Script is a premium PHP-based platform that enables creators to receive financial support from fans and subscribers. With seamless payment integrations, customizable layouts, and multi-language support, Sponzy allows you to create a community-focused platform that rivals the best in the business. The nulled version gives you complete access to its premium functionalities for free—no subscriptions, no hidden charges. Technical Specifications Script Type: PHP Laravel Framework Responsive Design: Fully Mobile-Optimized Database Support: MySQL 5.7+ Latest Version Compatibility: PHP 8+ Security: Integrated reCAPTCHA, CSRF Protection Powerful Features & Unique Benefits The Sponzy Nulled Script comes loaded with high-end features that give you a competitive edge: 1. Multi-Currency & Payment Gateway Support Integrate with PayPal, Stripe, and even cryptocurrency gateways to offer a seamless payment experience worldwide. 2. Membership Tiers Create different support plans with varying benefits to attract a wider range of supporters—from casual fans to superfans. 3. Real-Time Notifications Keep users engaged with real-time alerts for messages, tips, and subscription renewals. 4. GDPR-Ready and SEO-Friendly Built to meet modern data privacy regulations while optimizing your platform for search engines right out of the box. 5. Monetization Tools Enable tipping, subscriptions, and pay-per-view content—all built into the system with intuitive admin control. Why Choose Sponzy Nulled Script? Unlike many open-source alternatives, Sponzy Nulled Script is professionally designed and continuously updated. The nulled version saves you hundreds of dollars while providing the exact same user experience. It’s ideal for entrepreneurs, influencers, bloggers, and creative professionals who want to launch a content support platform without financial risk. How to Install Sponzy Nulled Script Download the script from our website. Upload it to your server using FTP or cPanel. Create a new MySQL database and import the included SQL file. Open the installation URL and follow the on-screen setup process. Log in to your admin panel and start customizing your platform! Use Cases of Sponzy Nulled Script Content Creators: Monetize exclusive videos, blogs, or artwork. Influencers: Offer membership perks to loyal followers. Nonprofits: Receive recurring donations without complex setups. Writers & Journalists: Launch subscription-based content easily. FAQs About Sponzy Nulled Script Q: Is it safe to use the nulled version? A: Yes, we ensure all scripts are scanned for malware and viruses before making them available. However, always use a secure hosting environment. Q: Can I update the script? A: Updates are manual, and you may need to download the latest version from our website when available. Q: Does it support RTL languages? A: Absolutely. Sponzy Nulled Script supports both LTR and RTL, making it perfect for global use. Q: Can I integrate custom themes? A: Yes, the script supports theme customization and development for a personalized user experience. Final Thoughts The Sponzy is more than just a content monetization tool—it’s your gateway to building a thriving digital community. Whether you're just starting out or scaling an established brand, Sponzy delivers professional-grade features without the professional-grade price tag. Don’t miss this opportunity to download it for free and unlock unlimited potential!
Looking for more premium resources? Check out our collection like avada nulled for even more web design flexibility. For a powerful eCommerce theme, try woodmart nulled—a must-have for modern online stores.
0 notes
Text
YI Cam Remote Access: Your Guide to Self-Hosted Surveillance

Want to have complete control over your YI Cam and go beyond its default cloud? For more privacy and customization, many users prefer YI Cam Remote Access, rather than using the manufacturer's cloud. Therefore, this post explores how to accomplish this sophisticated configuration, assisting you in navigating the frequently challenging process of self-hosting your camera's feed. Walk through this post to learn more details!
Understanding the YI Cam Remote Access
Generally, you need to install a custom firewall on your device if you want to access the YI camera remotely and connect it to your server. Additionally, it allows leveraging the benefits of the RTSP (real-time streaming protocol) streaming as well as FTP access. Moreover, it eliminates the need for third-party platforms and for configuring cameras to the self-hosted servers.
However, it acts as a “Network Remote Controller,” especially for the multimedia servers. It allows users to control media playback remotely. But it does not deliver audio or video streams continuously; instead, it communicates with the servers streaming the multimedia content. Hence, for the YI Cam Remote Access, users must connect their security cameras to the server through RTSP.
How to Connect Camera To Server for YI Remote Access?
Moreover, enabling the YI Cam Remote Access opens up several possibilities and advanced functionalities. So, let’s begin with the essential steps to Connect Camera To Server for managing and monitoring your YI camera remotely.
Initially, confirm your YI Cam supports the RTSP or streaming compatibility, as some models may require custom firmware.
Subsequently, set up your chosen server device, such as a computer, NAS, or Raspberry Pi, with a suitable operating system.
Next, install essential software like Blue Iris, MotionEye, FFmpeg, or Home Assistant to manage the video feed.
Finally, configure secure remote access using methods such as port forwarding, VPN, or Dynamic DNS for external viewing.
Now, you can view, configure, and control your YI camera remotely.
Bottom Line
In conclusion, YI Cam Remote Access empowers you with full control over your camera's feed through self-hosting, prioritizing privacy & customization. Additionally, this advanced setup typically requires RTSP compatibility, a dedicated server, and management software. With secure remote access methods such as VPN or port forwarding, you can ensure seamless monitoring from anywhere.
#YICameraSetup#YICamRemoteAccess#SelfHostedCamera#IPCameraSetup#RemoteCameraAccess#YICamOnServer#RTSPStream#ONVIFCamera#YICamRTSP
1 note
·
View note
Text
Ping vs Other Monitoring Methods: Why Choose Ping Monitoring?

In the digital world, your website or server is the front line of your business. Whether you're running an e-commerce platform, a blog, or a SaaS product, keeping your site live and responsive is essential. That’s where monitoring tools come into play. But with so many monitoring methods available, how do you choose the right one?
Among these, Ping Monitoring stands out for its simplicity and effectiveness. Let’s explore how it compares to other methods—and why it might be the best fit for your needs.
💡 What is Ping Monitoring?
Ping monitoring checks the availability of your server or website by sending small packets of data (ICMP echo requests) and waiting for a response. If the server replies, it’s online. If not, it may be down or unreachable.
✅ Benefits:
Real-time uptime checks
Fast detection of server failures
Lightweight and efficient
Easy setup
It’s perfect for quickly knowing whether your website or system is online without needing deep configuration.
🔧 Other Monitoring Methods Explained
Let’s take a look at some other popular methods:
1. HTTP Monitoring
Checks if a webpage loads correctly and returns the right status code (like 200 OK). It ensures the website is not only up but also functioning.
2. DNS Monitoring
Monitors if your domain name resolves correctly and quickly to the right IP address.
3. TCP Port Monitoring
Checks specific ports (e.g., 80 for HTTP, 443 for HTTPS, 21 for FTP) to ensure services are accepting connections.
4. Application Performance Monitoring (APM)
Deeply analyzes application behavior—response time, transaction flow, database calls, etc. Best for complex backend systems.
5. Synthetic Monitoring
Simulates user actions (e.g., logging in, adding to cart) to test the user experience from different regions.
📊 Ping vs Other Monitoring: A Quick Comparison
FeaturePing MonitoringHTTP MonitoringAPMSynthetic MonitoringSetup ComplexityVery LowLowHighMediumDetects Downtime Fast✅ Yes✅ Yes✅ Yes✅ YesDetects Broken Features❌ No✅ Sometimes✅ Yes✅ YesSimulates User Experience❌ No❌ No✅ Partially✅ YesIdeal ForServers, RoutersWebsitesWeb AppsFull User Journey
🕒 When to Use Ping Monitoring?
Ping monitoring is best when:
You want quick alerts for server uptime
You're monitoring basic infrastructure like web servers or routers
You don’t need application-level details
You need a low-cost and low-maintenance solution
It’s ideal for small businesses, developers, IT admins, and anyone who wants basic uptime tracking.
⚠️ Limitations of Ping Monitoring
While powerful, ping monitoring has some limitations:
Doesn’t detect if a website is returning errors (like 500 or 404)
Doesn’t check if a site’s layout is broken or buttons don’t work
Some firewalls may block ping requests
Doesn’t simulate actual user interaction
That’s why it’s often best to combine ping with other monitoring methods for complete coverage.
🚀 Why Choose Ping Monitoring with WebStatus247?
If you want easy, reliable, and global uptime checks, WebStatus247’s Ping Monitoring is a perfect choice.
Here’s what you get:
🌍 Global monitoring nodes
📩 Instant alerts via SMS or email
📊 Clean, simple dashboard
💸 Affordable plans
🧠 Easy setup – no technical skills needed
Whether you're monitoring one website or an entire network, WebStatus247 helps you stay ahead of downtime.
🏁 Final Thoughts
Ping monitoring may seem basic, but it's often the first and fastest line of defense against downtime. It’s lightweight, cost-effective, and incredibly useful for anyone managing a website or server.
0 notes
Text

How to Set Up Your Local Development Environment for WordPress
Setting up a local development environment is one of the best ways to experiment with and build WordPress websites efficiently. It offers you a safe space to test themes, plugins, and updates before applying changes to a live site. Whether you’re a beginner or an experienced developer, having a local environment is essential in streamlining your workflow and minimizing website downtime.
Before we dive into the technical steps, it’s worth mentioning the benefits of WordPress for your business website. WordPress offers unmatched flexibility, scalability, and user-friendliness, making it an ideal platform for businesses of all sizes. When paired with a solid local development setup, WordPress becomes even more powerful in enabling fast and secure site builds.
Step 1: Choose Your Local Development Tool
There are several local development tools available that cater specifically to WordPress users:
Local by Flywheel (now Local WP): Extremely beginner-friendly with features like SSL support and one-click WordPress installs.
XAMPP: A more general-purpose tool offering Apache, MySQL, PHP, and Perl support.
MAMP: Ideal for macOS users.
DevKinsta: Built by Kinsta, it offers seamless WordPress development and staging capabilities.
Choose the one that suits your OS and comfort level.
Step 2: Install WordPress Locally
Once you’ve chosen your tool:
Install the software and launch it.
Create a new WordPress site through the interface.
Set up your site name, username, password, and email.
After setup, you’ll get access to your WordPress dashboard locally, allowing you to install themes, plugins, and begin your customizations.
Step 3: Configure Your Development Environment
To ensure an efficient workflow, consider these configurations:
Enable Debug Mode: Helps in identifying PHP errors.
Use Version Control (e.g., Git): Keeps your changes tracked and manageable.
Database Access: Tools like phpMyAdmin help manage your WordPress database locally.
If your project requires dynamic functionality, leveraging PHP Development Services during the setup phase can ensure custom features are implemented correctly from the beginning.
Step 4: Customize Themes and Plugins Safely
With your local environment set up, now's the time to begin theme development or customization. You can safely create or modify a child theme, experiment with new plugins, and write custom code without any risk of affecting your live site.
For those unfamiliar with theme structures or WordPress standards, it’s often wise to hire a professional WordPress developer who understands best practices and can ensure clean, maintainable code.
Step 5: Syncing to a Live Server
After building and testing your site locally, you'll eventually want to push it live. Popular methods include:
Using a plugin like Duplicator or All-in-One WP Migration
Manual migration via FTP and phpMyAdmin
Using version-controlled deployment tools
Syncing should always be done carefully to avoid overwriting crucial data. Regular backups and testing are essential.
Step 6: Maintain Your WordPress Site Post-Launch
Launching your website is only the beginning. Ongoing updates, security patches, and performance optimization are critical for long-term success. Enlisting website maintenance services ensures your site remains fast, secure, and up-to-date.
Services can include:
Core, plugin, and theme updates
Malware scans and security hardening
Site performance monitoring
Regular backups
Final Thoughts
A local WordPress development environment not only speeds up your development process but also protects your live website from unintended changes and errors. With tools and strategies now more accessible than ever, there's no reason not to use one.From learning the basics to running advanced builds, setting up locally gives you the confidence and space to grow your WordPress skills. And if you want to see real-world examples or follow along with tips and tricks I share, feel free to check out my work on Instagram for practical inspiration.
0 notes
Text
How to Migrate to Offshore Dedicated Hosting Services Without Downtime
Switching to offshore dedicated hosting services can seem daunting, especially when ensuring your website remains accessible during the process. This guide will walk you through how to migrate smoothly and avoid interruptions to your online presence. By following these steps, you can keep your users happy and your business running seamlessly.
Why Choose Offshore Dedicated Hosting Services?
Offshore hosting provides unique advantages like enhanced privacy, greater freedom for content, and robust security. For businesses seeking reliable and high-performance solutions, offshore dedicated servers are an excellent choice. These servers ensure you have full control over your resources, delivering the speed and reliability your website needs.
Preparation Before Migration
Planning is the key to a smooth migration. Start by assessing your current hosting setup and identifying areas that need improvement. Offshore hosting service providers, like The Onion Host, offer tailored solutions to meet your specific needs. Here's what to do before starting:
Backup Your Data: Always create a complete backup of your website files, databases, and emails. This ensures you have a fallback in case anything goes wrong.
Choose the Right Offshore Hosting Provider: Compare offshore hosting service providers based on their server locations, support quality, and scalability.
Understand Your New Server: Familiarize yourself with the features and control panel of your offshore dedicated server. This knowledge will make the migration process smoother.
Step-by-Step Migration Process
Set Up Your Offshore Dedicated Server: Before transferring any data, ensure your new offshore server is configured and ready to go. Offshore dedicated hosting services often come with setup assistance to streamline this step.
Transfer Website Files: Use FTP or a similar tool to copy your website files to the new server. Keep the directory structure identical to avoid any errors.
Migrate Your Databases: Export your database from the current server and import it to the new one. Double-check database credentials to ensure they match the configuration on the new server.
Update DNS Settings: Point your domain name to the new server by updating the DNS records. This step is critical for ensuring a seamless transition. DNS changes might take 24-48 hours to propagate globally.
Test Thoroughly: Before finalizing the migration, test your website on the new server. Check for broken links, missing files, or performance issues.
Switch Live Traffic: Once testing is complete, make the new server live. Monitor the transition carefully to address any unexpected issues.
Minimizing Downtime During Migration
To ensure zero downtime:
Use a Temporary Domain: Test the new server with a temporary domain before updating DNS settings.
Schedule Migration During Low Traffic: Analyze your website traffic patterns and schedule the migration during off-peak hours.
Enable Dual Hosting: Keep your old server running until you confirm the new one is fully operational.
Communicate With Users: If minor disruptions are unavoidable, inform your users in advance to manage their expectations.
Post-Migration Checklist
After completing the migration, follow these steps:
Monitor Performance: Use analytics tools to track website performance and address any latency issues.
Update Backups: Create a new backup of your website on the offshore dedicated server.
Contact Support: Reach out to your hosting provider, such as The Onion Host, for any assistance with final configurations.
Conclusion
Migrating to offshore dedicated hosting services doesn't have to be stressful. With careful planning, reliable offshore hosting service providers, and attention to detail, you can achieve a seamless transition. Offshore dedicated servers not only enhance your website's performance but also provide unmatched flexibility and security. By following these steps, you can keep your website running smoothly and focus on growing your business.
0 notes
Text

The Role of JMeter in Performance Testing
In fast paced digital world testing your applications to ensure they are working well according to the demand of the users is very critical now a days. Performance Testing is a crucial process which is used to identify the application behavior under different load conditions. Apache JMeter is one of the most popular tools being used for this purpose; a robust open-source solution that every QA professional in the world relies on. This is a blog to feature about the role of JMeter in performance testing, its features and how tools like GhostQA simplify the process of testing.
What is Performance Testing?
Performance Testing is a type of non-functional testing which is performed to validate the properties of the system to know the behavior of the system with respect to responsiveness, stability, scalability along with the speed under different workloads. It allows you to find bottlenecks, fine-tune application performance, and provide a smooth user experience.
Some of the key types of performance testing are:
Load Testing: Tests system behavior under anticipated load.
Stress Testing: Validates system performance during alarming loads or peak loads.
Spike Testing: Tests the performance, if the load in a system suddenly increases or decreases.
Endurance Testing: Tests stability with long term high usage.
Scalability Testing: It checks whether the system can grow in terms of user base or data volume or not.
Introduction to JMeter
JMeter is a performance testing tool developed by the Apache Software Foundation and widely used as an open-source convenient tool for beginners. JMeter is one of the best open-source performance testing tools available, originally developed for web apps but now helping with its multi-protocol support with it also supporting various media applications.
Key Features of JMeter:
Protocol Support: HTTP, HTTPS, FTP, TCP and JDBC.
Customizable Test Plans: Create complex scenarios like messaging test plans through GUI.
Extensibility: Users can design complex scenarios using GUI.
Visualization Tools: Implements Plugins & Scripting for complex tasks.
Scalability: It supports simulating thousands of users with distributed load testing.
The Role of JMeter in Performance Testing
As one of the most integral pieces of a performance testing process for applications of all shapes and sizes, JMeter aims to fill that gap. So, let us check how we can use JMeter to contribute into performance testing process:
1. Load Simulation
JMeter can be used by testers to create a simulation of multiple users accessing an application simultaneously. Testers do this by creating virtual users and simulating load at different levels, and how the application performs at each level.
2. Comprehensive Protocol Support
JMeter supports multiple protocols in this manner, you can see JMeter is not just tied to web applications. It can be used for performance testing all kinds of API, Database, and File server; an all-in-one solution for testing across multiple systems.
3. Scenario Creation and Execution
While JMeter is often associated with web apps, it supports many other protocols, as well. Since it can test APIs, databases, and file servers, it is a cross-system tool for performance testing.
4. Detailed Performance Metrics
For Test Scenario Designing, JMeter GUI is pretty simple and easy. Testers can define user journeys, adjust test settings and execute the tests to view example behavior of the application under load.
How GhostQA Enhances Performance Testing with JMeter
JMeter is powerful but difficult to setup and maintain for non-expertise. That is where GhostQA comes into the picture, bringing performance testing to ease through a JMeter-based engine with a straightforward interface.
Key Advantages of GhostQA’s JMeter Integration:
Ease of Use GhostQA is fast and simple as it doesn’t need you to script or use complex technical skills. With a simple interface, we allow testers who may be unfamiliar with JMeter to build these types of tests easily.
Automated Test Execution GhostQA is capable of automating the performance tests for users and even allowing them to schedule the tests. It gives you stable and reproducible tests, which helps you write tests that are efficient and dependable.
Detailed Reporting GhostQA includes full test reports, metrics on response time/throughput and error analysis. The reports are provided in a readable format to facilitate an understanding of test results by stakeholders.
Auto-Healing Capabilities Sometimes application behavior changes cause tests to fail. GhostQA’s auto-healing capabilities find and catch these changes automatically, allowing to spend less time maintaining tests.
Benefits of Using JMeter for Performance Testing
1. Cost-Effective Solution
Being an open-source tool, JMeter is also a great and low-cost option for performance testing, without any compromise on features offered.
2. Versatility
Whether it be simple load testing or something more complex like distributed testing, JMeter will give you results in several scenarios.
3. Community Support
JMeter is a popular tool which is very well supported by the community. Tutorials, plugins, and available forums to troubleshoot or extend capabilities are there, too, for testers.
4. Scalable Testing
JMeter can be used for small websites testing or for large enterprise applications testing.
Common Challenges in Using JMeter for Performance Testing
Although JMeter can be beneficial there are few challenges it has to face:
Steep Learning Curve: It can be tough for a newcomer to make it through complex test plans.
High Resource Consumption: Large tests can consume high system resources.
Limited Real-Time Analysis: Though JMeter does provide some reports but analyzing the data at the run-time is a hell of a task.
Here, GhostQA comes to the rescue, providing a simplified and resource-efficient platform that makes the performance testing process seamless with JMeter.
The Future of Performance Testing with JMeter and GhostQA
With the modern applications getting complex, the need for performance testing tools like JMeter will always be in demand. Tools like GhostQA are embracing this AI and automation wave to generate efficiency in testing.
Conclusion
JMeter has been the go-to tool for performance testing and is still commonly used due to its flexibility, scalability as well as metrics. Its sophisticated system combined with frameworks like GhostQA makes it very productive and valuable to comparing QA team. Whether you are a small startup or an established enterprise, GhostQA and its bubble gum performance test powered by JMeter, can guarantee that your applications meet the standards of peak performance and reliability they must achieve.
Looking to simplify your way through performance testing? Join GhostQA and step into the future of testing, now!
0 notes
Text
ITNW1337 MODULE 1 TO 3 GANGBO'S PORTFOLIO
Bio
30 years old, originally from the Benin Republic. Currently stationed at Fort Hood, Texas, serving as a combat engineer in the US Army. Immigrated to the US in 2016 to improve English and pursue personal development. Now pursuing an associate degree in Information Technology (IT), aiming for a successful transition from military to civilian life. Enthusiastic about online education and eager to connect with fellow students.
INTRODUCTION
The Internet is a vast network of interconnected computers that enables users to communicate, access, and share information. It serves as a platform for various online activities, such as research, communication, and entertainment. My ITNW 1337 class, covering modules 1 to 3, explores a wide range of topics, starting with the methods and tools required to connect to the Internet, including various types of connections like broadband and mobile, as well as network setup.
The course introduces web browsers—software applications that facilitate Internet navigation—discussing features like tabs, bookmarks, and history. It also focuses on effective searching techniques using search engines, providing tips for refining search queries to quickly find relevant information.
Additionally, the modules cover the basics of email, including how to create an account, send and receive messages, and manage attachments. There's an exploration of cloud storage solutions that allow users to store and access files online, along with productivity tools that enhance collaboration and efficiency.
The course discusses different methods for transferring files, such as email attachments, cloud services, and FTP (File Transfer Protocol). It examines various online platforms for sharing information and engaging with communities, highlighting their functionalities and purposes.
Furthermore, the modules introduce technologies that enable quick access to information through mobile devices, discussing their applications in marketing and communication. Finally, the course module 3 summarizes eight essential skills or tools necessary for effectively navigating the digital landscape, emphasizing their importance in everyday online interactions.
Overall, these modules aim to equip users with the essential skills needed to navigate the Internet successfully and utilize its vast resources for both personal and professional growth.
Module 1
Key Concepts
What is the Internet?
The Internet is the largest global network of interconnected computers, known as a "network of networks," enabling communication and data transfer between billions of devices.
Originating from ARPANET, it transitioned from a government project to a public network by 1995.
How the Internet Works
The Internet relies on physical infrastructure like fiber optics, cable, and telephone lines.
Devices communicate using an addressing system based on the Internet Protocol (IP), with IPv4 being the original structure, now transitioning to IPv6 to accommodate more devices.
Domain Name Servers (DNS) translate human-friendly URLs into IP addresses, simplifying web navigation.
Accessing the Internet
Access requires a device and an Internet connection, typically through ISPs. Major connection types include Fiber Optic, Cable, DSL, Fixed Wireless, Satellite, and Cellular.
Web Browser Basics
Web browsers (e.g., Chrome, Firefox, Edge, Safari) are applications used to access the World Wide Web. They retrieve web pages based on URLs.
Internet Search Tools
Search engines help users find information online by indexing web pages using algorithms (e.g., PageRank) to determine relevance.
Effective searching requires understanding how to use search engines, including query operators and advanced search techniques.
Documents and Links
Links or documents that support my learning.
youtube
youtube
youtube
content.ctcd.edu/courses/itnw1337oer/m21/docs/cheat_sheet_search.pdf
www.bing.com/ck/a?!&&p=54eebb917e039ffee2bdc5f50a891bd748bcdd37c467dfda4f890a8fc71c52c5JmltdHM9MTcyNjk2MzIwMCZpbnNpZD01MjEx&ptn=3&ver=2&hsh=4&fclid=2f1955d3-0e7c-615d-1d19-41000f2b6077&psq=Visual+representation+of+IPv4+vs.+IPv6&u=a1aHR0cHM6Ly93d3cueW91dHViZS5jb20vd2F0Y2g_dj12bzVnbEs5Y3pJRQ&ntb=1
Overall understanding the fundamental concepts of the Internet, how it works, and the tools available for accessing and navigating it is crucial for both personal and professional growth. This knowledge empowers me to use the Internet more effectively, enabling efficient research, communication, and collaboration. I can apply these skills to improve my online learning experience and help others in navigating digital spaces, fostering a more connected and informed community. By mastering search techniques and browser functionalities, I’ll be better equipped to find reliable information
Module 2
This module explores essential communication and productivity tools that enhance both personal and professional life, such as email services, cloud storage, and file transfer protocols. These technologies enable instant communication, data storage, and easy file sharing across devices, improving efficiency in today’s digital world.
Key Concepts Learned
Email Services:
Definition: Email is an electronic communication tool allowing users to send and receive messages via the Internet.
Key Elements: Emails include a username and domain name separated by the “@” symbol. Hosted email addresses (e.g.gov, Edu, .mil) are organization-specific, while webmail services (e.g., Gmail, Yahoo, Outlook) are free and widely used for personal and business purposes.
Common Features: Address book, calendar, and instant messaging options are often included.
Cloud Storage and Productivity:
Definition: Cloud storage allows users to save data on remote servers (not their local computers) and access it from any device with an Internet connection.
Common Cloud Services: Google Drive, Microsoft OneDrive, Dropbox, and Apple iCloud.
Benefits: File sharing, collaboration, data backup, and the ability to work from anywhere.
Productivity Tools: Web-based applications like Google Docs and Microsoft Office 365 allow users to create and collaborate on documents, spreadsheets, and presentations.
Transfer of Information on the Internet:
Email Attachments: Files can be attached to emails for easy sharing.
Cloud Storage File Sharing: Users can upload files to cloud services and invite others to view or download them.
File Transfer Protocol (FTP): A method for transferring large files over the Internet, often used by web developers. FTP requires an FTP client like FileZilla or WinSCP to manage file transfers.
Links to Resources
youtube
youtube
youtube
Reflection Section
This module helped me understand how communication technologies like email and cloud storage simplify both personal and professional tasks. I can now effectively use cloud storage services to backup and share files. Additionally, learning about FTP has broadened my understanding of how web developers manage large file transfers. In my future career, especially in IT, I see myself applying these skills to enhance collaboration and streamline workflows, particularly in remote work environments.
Module 3
This module covers the evolution of communication platforms and digital interactions through social media, blogs, wikis, and forums, along with innovations like QR codes, NFC technology, and emerging technologies. These tools revolutionize how we connect, share information, and engage with digital content, while advanced technologies like AI, blockchain, and IoT are shaping the future.
Key Concepts Learned and Definitions
Social Media Platforms:
Definition: Social media includes a wide variety of platforms that allow users to share content, connect, and collaborate. These platforms range from blogs and forums to content communities and wikis.
Examples:
Content Communities: YouTube, Pinterest
Blogs: WordPress, Blogger
Forums: Quora, StackExchange
Wikis: Wikipedia, WikiHow
Social Networks: Facebook, LinkedIn, X (formerly Twitter)
Podcasts: BuzzSprout, Spreaker
Usage:
Social media allows for different types of interaction:
Blogs: Author-centric platforms for sharing opinions and information with readers.
Wikis: Collaborative platforms where content is created and modified by multiple users.
Forums: Discussion-based platforms where users can share their thoughts on specific topics.
QR Codes, SnapTags, and NFC Technology:
QR Codes: Two-dimensional barcodes that can be scanned with mobile devices to access digital content or websites.
SnapTags: An advanced version of QR codes, offering additional features and interactivity without needing special apps or high-end phones.
NFC (Near Field Communication): A short-range wireless technology that allows devices to exchange information when they are in close proximity (less than 4 inches), widely used in contactless payments and data sharing.
The Essential Eight Technologies:
Internet of Things (IoT): A network of physical devices connected via the Internet, capable of collecting and sharing data.
Artificial Intelligence (AI): Machines simulating human intelligence to perform tasks like decision-making and problem-solving.
Blockchain: A decentralized digital ledger that records transactions across multiple computers securely.
Augmented Reality (AR): Technology that overlays digital content onto the real world through devices like smartphones.
Virtual Reality (VR): A simulated experience using a headset that immerses users in a digital environment.
Advanced Robotics: Robots with enhanced capabilities used in fields like manufacturing, healthcare, and defense.
Quantum Computing: A new computing paradigm that leverages quantum mechanics to solve complex problems faster than classical computers.
Neuromorphic Computing: Computing systems designed to mimic the human brain's neural structure for improved AI processing.
Links to Resources
youtube
youtube
youtube
Reflection Section
This module introduced me to the various tools we use for digital communication and collaboration, such as social media platforms, QR codes, and NFC technology. I was particularly interested in learning how platforms like blogs and forums differ in terms of interactivity and content ownership. Additionally, exploring technologies like NFC, SnapTags, and the Essential Eight provided valuable insights into the future of digital communication, payments, and AI-driven innovations.
In my IT career, I can apply this knowledge by leveraging NFC for secure data exchange or contactless payments, and by staying informed about how emerging technologies like AI and blockchain will impact industries. Understanding these tools will help me adapt to new tech trends and possibly integrate these advancements into business solutions.
1 note
·
View note
Text
Guide to Torrenting Safely and Efficiently in 2024-2025

Torrenting is a fast and easy way to share files like software, media, and data. But it comes with risks if you don’t take the proper precautions. Whether downloading open-source content or large files, knowing how to torrent safely in 2024-2025 is key. This guide will show you how to use tools like Seedbox, Jackett, magnet link converters, and more to make torrenting safer and more efficient. How to Torrent Safely in 2024 To torrent safely, you need the right tools. Here’s what you can do: 1. Use a Seedbox A seedbox is a remote server that handles your torrent downloads and uploads. This means all your torrenting happens on the seedbox, not your computer. Using a seedbox, your IP address stays hidden from the torrent network, and you can safely transfer files to your device afterward. Here’s why using a seedbox helps: ISPs can’t track or throttle your connection: Since your torrenting is done on a remote server, your ISP won’t see any torrent activity on your network. This prevents them from slowing down your internet or monitoring what you download. Reduced legal risk: Your IP address stays protected, which helps avoid legal issues from downloading copyrighted files. Protection from hackers: A seedbox hides your IP from other users, reducing the risk of attacks from bad actors. When choosing a seedbox, look for: High-speed downloads and uploads: Seedboxes offer fast internet speeds, sometimes up to gigabit levels, so your downloads will be quick. Large storage space: Ensure the seedbox has enough room for all your files. SFTP or FTP access: These secure methods let you safely download your files from the seedbox to your computer. Built-in torrent clients: Most seedboxes have software like qBittorrent or Deluge that is already set up. Popular seedbox services include RapidSeedbox, Seedbox.io, and Ultraseedbox, which provide fast speeds and protect your privacy. 2. Use Jackett for Better Searches Finding good torrents can be challenging. Jackett helps by connecting your torrent client (like qBittorrent) to multiple torrent search engines simultaneously. How Jackett Works: Jackett converts search requests from your torrent client into API calls to different torrent sites. It gathers results from many trackers and sends them back to your client. This saves time and ensures you get the best results. Benefits: Access torrents from many sources. Search multiple sites automatically without browsing. Customize trackers to your preferences. To use Jackett: Install Jackett > Add your favorite torrent sites > Connect Jackett to your torrent client using an API key. This setup makes searching for torrents much easier. 3. Convert Magnet Links to Torrent Files Magnet links let you download a torrent without needing the actual .torrent file. But sometimes, you may need the file for backups or specific tools. Learn how to convert magnet links to torrents in detail. How to Convert: Copy the magnet link. Use an online magnet-to-torrent converter (such as Magnet2Torrent). Download the .torrent file and load it into your client. This gives you more control over your downloads. 4. Choose the Right Torrent Client Your torrent client manages your downloads and uploads. Choose one that is lightweight, secure, and has useful features. Some top torrent clients in 2024 are: qBittorrent: Lightweight, ad-free, and open-source. Deluge: Highly customizable with plugins. Transmission: Simple and widespread among Linux users. Vuze: Feature-packed but heavier on system resources. Ensure your client supports encryption and peer exchange for better privacy and speed. 5. Avoid Public Trackers Public trackers like The Pirate Bay are open to everyone, increasing the risk of malware and legal trouble. Stick to trusted private trackers when possible. They offer: Better file quality. Fewer fake or harmful torrents. Faster downloads due to active communities. Private trackers often require an invitation, but they’re worth the effort for serious torrenting. 6. Seed Safely Seeding is when you share the files you've downloaded with other users. It helps keep torrents active by allowing others to download pieces from your computer. Torrenting works on a peer-to-peer (P2P) system, where users download and upload parts of a file. By seeding, you help keep files available for everyone. Always seed through a VPN to protect your IP. Also: Set upload limits to avoid slowing your connection. Enable encryption to hide torrenting from your ISP. 7. Enable Encryption Within Your Torrent Client Most torrent clients today offer some level of encryption for P2P connections. Enabling this feature can help prevent your ISP from detecting that you’re torrenting, reducing the chance of throttling or monitoring. While it’s not as strong as a VPN, it adds an extra layer of privacy by making your traffic harder to track. To enable encryption: Open your torrent client (like qBittorrent or Deluge). Go to the settings or preferences menu. Navigate to the "BitTorrent" or "Network" section. Choose "Forced Encryption" or "Enable Encryption," depending on your client. Encryption may limit the number of peers (since not all clients support it), but it improves your privacy. 8. Use Proxy Servers for Extra Privacy A proxy server routes your torrent traffic through a third-party server, masking your IP address. Unlike a VPN, proxies don’t encrypt all your traffic, just the part that goes through the proxy. SOCKS5 proxies are popular for torrenting because they provide anonymity without slowing your internet as much as a VPN. Some VPN providers, like NordVPN and PIA, offer SOCKS5 proxies as an additional service. To set up a proxy for torrenting: Open your torrent client. Go to Settings > Connection. Enter the proxy details provided by your service (address, port, username, password). Set the connection type to SOCKS5. This masks your IP address without affecting your overall connection speed. 9. Scan Torrents for Malware and Viruses Downloading torrents from public trackers can be risky, as they may contain malware or viruses. Protect yourself by scanning all files before opening them. How to avoid malware: Use antivirus software: Keep your antivirus updated and scan all downloaded files. Tools like Avast, Bitdefender, or Windows Defender offer good protection. Verify torrents: Look for verified torrents or check user feedback and comments to ensure the file is safe. Use a sandbox or virtual machine (VM): Run software in an isolated environment like a VM to prevent malware from affecting your main system. By scanning files and checking their authenticity, you can reduce the risk of infections. 10. Keep Your Torrent Client Updated Torrent clients can have security vulnerabilities, making them a target for hackers. Keeping your client updated with security patches is critical for safe torrenting. To stay protected: Enable automatic updates for your torrent client. Check the developer’s website or forums for news on security updates. Switch clients if your current one stops receiving updates. Unmaintained software can become a security risk. Popular clients like qBittorrent, Deluge, and Transmission regularly release updates to improve security. Always use the latest version to stay safe. Conclusion Torrenting in 2024 can be safe if you use the right tools and follow these best practices. With Jackett for searching, magnet link converters for flexibility, and VPNs for privacy, you can enjoy the benefits of torrenting while staying secure. Torrenting is legal, but downloading copyrighted content without permission is not. Always check that the files you share or download are legal. Stay safe and happy torrenting! Read the full article
0 notes
Text
What types of proxy servers are available? Which one is best for you?
Today we're going to talk about proxy servers, which many people use for cross-border e-commerce, web crawling, and even everyday browsing. So how many types of proxy servers are there? And what are the characteristics of each type? Next for you to introduce one by one, by the way, to see which kind of proxy is more suitable for your needs.

1. HTTP proxy
HTTP proxy is the most common type of proxy server, which is mainly used to handle web browsing requests. It can help users hide their real IP addresses and access various HTTP websites.HTTP proxy works by receiving user requests, forwarding them to the target server, and then returning the response from the target server to the user.
· Application Scenarios: Web crawler, data crawling, web browsing, cross-region access to restricted websites.
· Advantages: simple, fast, can be used for HTTP protocol.
· Disadvantages: does not support encrypted connections, lower security.
2. HTTPS proxy
HTTPS proxy is similar to HTTP proxy, but it supports SSL encryption, which means you can securely access HTTPS websites. This proxy not only hides the IP, but also encrypts the transmitted data to prevent information from being stolen.
· Application Scenarios: Secure browsing, sensitive data transmission, encrypted internet connection.
· Advantages: supports encryption to ensure data security.
· Disadvantages: performance is slightly slower than HTTP proxy, configuration is a bit complicated.
3. SOCKS5 proxy
SOCKS5 proxy is a more advanced type of proxy, which not only supports HTTP and HTTPS, but also other protocols (such as FTP, P2P, etc.). The most important feature of SOCKS5 proxy is the flexibility and security of the transport layer, which not only bypasses the network limitations, but also effectively hides the user's IP.
· Application Scenarios: game acceleration, video streaming, multinational e-commerce, bypassing firewalls.
· Advantages: supports multiple protocols, fast speed and high security.
· Disadvantages: relatively complex setup, may require additional configuration support.
4. Transparent proxy
The special feature of transparent proxy is that users usually do not know they are using a proxy server. It is mainly used in enterprise or public networks to control users' online behavior, such as restricting access to certain websites.
· Application scenarios: enterprise network, school network, public Wi-Fi management.
· Advantages: no user configuration required, runs directly in the background.
· Disadvantages: does not provide privacy protection, user's real IP is still visible.
5. Anonymous proxy
Anonymous proxy, on the other hand, is specialized for those users who want to hide their identity. It will hide the user's real IP, but will not tell the target server that you are using a proxy, thus increasing the anonymity of access.
· Application scenarios: privacy protection, network security, cross-border business.
· Advantages: Hide user IP, protect privacy.
· Disadvantages: Some services may deny access to anonymous proxies.
Each proxy server has its unique features and application scenarios. If you need to do simple web browsing, HTTP proxy or HTTPS proxy is a good choice; if you need more protocol support and higher privacy protection, then SOCKS5 proxy is the best choice. Of course, 711Proxy also provides efficient and secure proxy services, no matter you need HTTP, SOCKS5 or other types of proxies, we can meet your needs!
0 notes
Text
FoodTiger Nulled Script 3.6.0

Unlock the Power of FoodTiger Nulled Script for Your Food Delivery Business Are you ready to revolutionize your food delivery startup with a robust and feature-rich platform? Look no further than the FoodTiger Nulled Script—a powerful solution designed to streamline operations, support multiple restaurants, and deliver exceptional user experience. This script is perfect for entrepreneurs and developers looking for a fast, reliable, and customizable tool to kick-start their food ordering service without the hefty price tag. What is FoodTiger Nulled Script? The FoodTiger Nulled Script is a premium food delivery software that has been unlocked for free access. Originally developed as a high-end solution for managing food delivery businesses, this nulled version offers you all the premium features—without any restrictions. With its intuitive interface and powerful admin dashboard, you can manage restaurants, orders, and customers with ease. It’s an excellent alternative for startups looking to save money while still accessing top-tier software. Technical Specifications Platform: Laravel PHP Framework Database: MySQL Languages: Fully multilingual with built-in translation support Responsive: 100% mobile-friendly layout Third-Party Integration: Supports Stripe, PayPal, and more Outstanding Features & Benefits Multi-Restaurant System: Perfect for marketplaces—host multiple restaurants under one roof. Real-Time Order Tracking: Let your users track their orders from kitchen to doorstep. Advanced Admin Panel: Manage restaurants, menus, discounts, and delivery zones effortlessly. Modern UI/UX: Sleek and intuitive design that enhances customer satisfaction. Contactless Delivery: Built-in support for safe, contactless food delivery methods. Why Choose FoodTiger Nulled Script? Choosing the FoodTiger gives you access to premium tools without licensing fees. You get the flexibility to customize every part of the system, from UI layouts to backend logic. It’s ideal for freelancers, startups, and developers who want full control over their food delivery platforms. Say goodbye to limitations and hello to a world of possibilities—all without spending a dime. Common Use Cases Launching a multi-vendor food delivery app in your local area Building a white-label solution for restaurant chains Starting a commission-based food ordering marketplace Testing new delivery models and logistics solutions with zero upfront cost How to Install FoodTiger Nulled Script Download the FoodTiger Nulled Script from our website. Upload the files to your server using FTP or cPanel. Set file permissions and create a new MySQL database. Run the installer by accessing your domain in a web browser. Follow the setup wizard and enter your database credentials. Login to the admin panel and start configuring your platform. Frequently Asked Questions (FAQs) Is it legal to use the FoodTiger Nulled Script? While using nulled scripts may violate the original developer’s terms, many users opt for them to test or build proof-of-concept platforms. We encourage using it responsibly and considering licensing options if you plan to scale. Can I customize the FoodTiger Nulled Script? Absolutely. The script is fully open-source and built on Laravel, allowing deep customization of features, design, and functionalities. Is this version secure for live deployments? The FoodTiger Nulled Script includes the same core security features as the licensed version. However, always perform your own audits and use secure hosting practices for best results. Where can I download the FoodTiger Nulled Script? You can download the latest version directly from our website and get started today with no hidden costs or restrictions. Start Building Your Delivery Empire Today Whether you’re a developer building a food delivery app or an entrepreneur aiming to create the next big thing in local delivery services, the FoodTiger is your gateway to fast, affordable, and scalable success. Don’t miss the opportunity to harness this powerful tool for free.
Check out our other valuable downloads like betheme nulled and explore even more resources to enhance your web projects. Need additional themes and scripts? Visit our trusted partner for more tools like betheme nulled to power up your development journey.
0 notes
Text
Sure! Here's a long article in English that incorporates the phrase "upload files":
---
**The Evolution and Impact of File Upload Technologies**
In the digital age, the process of uploading files has become a fundamental component of both personal and professional activities. From sharing vacation photos with friends to submitting important business documents, the ability to upload files efficiently and securely has transformed how we interact with technology and each other.
**The Early Days of File Uploads**
In the early days of the internet, file uploads were a cumbersome process. Dial-up connections were slow, and the file sizes were often limited. Early file transfer protocols, such as File Transfer Protocol (FTP), were used primarily by tech-savvy individuals to move files between computers. These methods required a fair amount of technical knowledge and could be prone to errors and interruptions.
**The Rise of Cloud Storage**
The advent of cloud storage solutions marked a significant shift in file upload technology. Services like Dropbox, Google Drive, and OneDrive revolutionized how files were uploaded and stored. Instead of relying on physical media or complex FTP setups, users could now upload files to a remote server with just a few clicks. This transition made it easier for individuals and businesses to manage their files and access them from anywhere with an internet connection.
Cloud storage also introduced new concepts of file sharing and collaboration. Users could now upload files to a shared folder and collaborate in real-time with colleagues or friends. This feature proved particularly valuable for teams working on projects from different locations, as it streamlined communication and ensured everyone had access to the latest versions of documents.
**Security and Privacy Concerns**
As file upload technologies evolved, so did the concerns surrounding security and privacy. The more files we upload to the cloud, the more critical it becomes to protect that data from unauthorized access. Many cloud storage providers have implemented robust encryption protocols to secure files both during transit and while at rest. Additionally, two-factor authentication and other security measures help safeguard user accounts from potential breaches.
Despite these advancements, data breaches and cyber-attacks remain significant concerns. Users must be vigilant about the information they upload and the platforms they use. Understanding the privacy policies of cloud services and employing best practices for password management are essential steps in maintaining the security of uploaded files.
**The Role of File Uploads in Modern Business**
In the business world, file uploads are crucial for a wide range of activities. For instance, professionals routinely upload files to share reports, presentations, and other critical documents. This functionality supports seamless workflow integration and enhances productivity. File upload technologies have also paved the way for the rise of remote work, as employees can easily upload and access files from any location, fostering a more flexible work environment.
Furthermore, businesses use file uploads for customer interactions, such as submitting support tickets or providing feedback. This feature streamlines communication and improves customer service by enabling users to provide detailed information or documentation that can be reviewed by support teams.
**Emerging Trends and Future Directions**
Looking ahead, file upload technologies are expected to continue evolving. Advances in artificial intelligence (AI) and machine learning are likely to enhance the efficiency of file management systems. For example, AI-driven tools could automatically categorize and tag files, making it easier for users to find and organize their documents.
Another trend is the growing emphasis on decentralized storage solutions, such as blockchain technology. These systems offer increased transparency and security by distributing data across a network of nodes, reducing the risk of centralized data breaches.
**Conclusion**
The ability to upload files has become a cornerstone of modern digital interactions. From its humble beginnings to its current state, file upload technology has significantly impacted how we store, share, and manage information. As we continue to advance technologically, the evolution of file upload methods will likely bring about new innovations and improvements, further shaping the way we connect and collaborate in the digital world.
---
Feel free to let me know if you need any adjustments or additional details!
0 notes
Text
How to Get Started with Magento Commerce: A Step-by-Step Guide

Why Choose Magento Commerce?
Magento Commerce, a leading ecommerce platform, offers a comprehensive suite of tools and features designed to help businesses thrive in the digital marketplace. Known for its scalability, flexibility, and extensive customization options, Magento Commerce is an ideal choice for businesses of all sizes. Whether you're seeking robust magento ecommerce solutions or working with a magento ecommerce agency, this guide will walk you through the essential steps to get started with Magento Commerce.
Step 1: Understanding the Requirements for Magento Commerce
Before diving into the setup process, it's crucial to understand the system requirements for running Magento Commerce smoothly. This includes:
Server Requirements: Ensure your hosting environment meets Magento’s technical specifications, including PHP, MySQL, and Apache/Nginx compatibility.
Hardware Requirements: Adequate server resources, such as sufficient RAM, CPU, and storage, are essential for optimal performance.
Software Requirements: Necessary software includes Composer, a suitable PHP version, and other dependencies specified in Magento’s documentation.
Step 2: Choosing the Right Magento Commerce Plan
Magento Commerce offers several plans tailored to different business needs. Assess your business size, budget, and specific requirements to choose the appropriate plan. Options include:
Magento Open Source: A free version with basic features suitable for small businesses.
Magento Commerce (Cloud): A paid version with advanced features, cloud hosting, and enhanced support.
Consulting with a magento ecommerce agency can help you select the best plan to match your business objectives and growth potential.
Step 3: Setting Up Your Hosting Environment
Choosing the right hosting environment is critical for the performance and reliability of your Magento store. Consider the following options:
Shared Hosting: Cost-effective but may lack the performance needed for larger stores.
Dedicated Hosting: Offers better performance and control but at a higher cost.
Cloud Hosting: Scalable and flexible, suitable for growing businesses with fluctuating traffic.
Ensure your hosting provider offers robust security measures and 24/7 support.
Step 4: Installing Magento Commerce
With your hosting environment set up, the next step is to install Magento Commerce. Follow these steps:
Download Magento Commerce: Obtain the latest version from the Magento website.
Upload Files: Transfer the Magento files to your server using FTP/SFTP.
Set Up Database: Create a new MySQL database for Magento.
Run the Installation Wizard: Access the installation wizard through your browser and follow the prompts to complete the setup.
Step 5: Configuring Your Store Settings
After installation, configure your store settings to ensure optimal performance and functionality:
General Settings: Set your store name, address, email, and other basic information.
Locale Options: Configure your time zone, currency, and language preferences.
Tax Settings: Set up tax rules according to your business location and legal requirements.
Step 6: Customizing Your Store’s Appearance
Magento Commerce allows extensive customization to reflect your brand identity. Key customization options include:
Themes: Choose from pre-built themes or create a custom design to enhance your store’s visual appeal.
Layout: Configure layouts for different pages, including the homepage, category pages, and product pages.
Branding: Add your logo, brand colors, and custom fonts to create a cohesive brand experience.
Step 7: Adding Products to Your Magento Commerce Store
Populate your store with products by following these steps:
Product Categories: Organize products into categories for easy navigation.
Product Listings: Add detailed product information, including names, descriptions, prices, and images.
Inventory Management: Configure stock levels, SKU numbers, and other inventory settings.
Utilize Magento’s bulk upload feature to save time when adding multiple products.
Step 8: Setting Up Payment and Shipping Options
Configure payment and shipping options to provide a seamless checkout experience:
Payment Methods: Integrate popular payment gateways like PayPal, Stripe, and credit cards.
Shipping Options: Set up shipping methods, rates, and regions. Offer options like free shipping, flat rate, and carrier-specific methods.
Ensure your payment and shipping configurations comply with your business model and customer expectations.
Step 9: Testing Your Store Before Launch
Before going live, thoroughly test your Magento store to identify and fix any issues:
Functionality Testing: Ensure all features work as expected, including product search, checkout process, and payment gateway integration.
Performance Testing: Test your store’s speed and responsiveness to ensure a smooth user experience.
Security Testing: Verify that your store is secure, with measures in place to protect against threats like SQL injection and cross-site scripting.
Step 10: Launching Your Magento Commerce Store and Post-Launch Tips
With testing complete, you’re ready to launch your Magento Commerce store. Follow these final steps:
Go Live: Make your store accessible to the public by updating DNS settings and removing any maintenance pages.
Monitor Performance: Continuously monitor your store’s performance, traffic, and sales.
Regular Updates: Keep your Magento installation, themes, and extensions updated to ensure security and functionality.
Seek Professional Help: Work with a magento ecommerce agency for ongoing support and optimization.
Related Post: A Complete Guide to Magento eCommerce: All You Need to Know
0 notes
Text
es file explorer vpn setup free
🔒🌍✨ Get 3 Months FREE VPN - Secure & Private Internet Access Worldwide! Click Here ✨🌍🔒
es file explorer vpn setup free
ES File Explorer
ES File Explorer is a multifunctional file management tool designed for Android devices. It serves as a comprehensive solution for organizing, accessing, and managing files and applications on smartphones and tablets. Developed by ES Global, this app offers a wide range of features that cater to the diverse needs of users.
One of the key functionalities of ES File Explorer is its ability to navigate through the file system with ease. Users can browse through their device's internal storage, SD card, and external storage options effortlessly. The intuitive interface allows for seamless navigation, making it simple to locate and manage files and folders.
Another standout feature of ES File Explorer is its support for various file formats. Whether it's documents, images, videos, or music files, the app can handle them all. Users can view, copy, move, rename, and delete files with just a few taps, making file management tasks quick and convenient.
In addition to basic file management functions, ES File Explorer offers advanced features such as cloud storage integration, FTP client support, and built-in file compressing and decompressing capabilities. This enables users to access their files from multiple sources and easily share them with others.
Furthermore, ES File Explorer comes with a built-in app manager that allows users to uninstall or backup installed applications, freeing up valuable storage space and improving device performance.
Overall, ES File Explorer is a versatile tool that provides users with a robust set of features for managing their files and applications on Android devices. Its user-friendly interface, extensive file format support, and advanced functionalities make it a must-have app for anyone looking to streamline their mobile file management experience.
VPN setup
Title: A Comprehensive Guide to Setting Up a VPN for Enhanced Online Security
In today's digital age, safeguarding your online privacy and security is paramount. One effective tool for achieving this is a Virtual Private Network (VPN). By encrypting your internet connection and routing it through remote servers, a VPN shields your browsing activity from prying eyes and potential threats. If you're new to VPNs and wondering how to set one up, this guide will walk you through the process step by step.
Choose a reputable VPN provider: Start by researching and selecting a VPN service that meets your needs in terms of security features, server locations, and pricing plans. Popular options include NordVPN, ExpressVPN, and Surfshark.
Sign up and download the VPN app: After choosing a provider, sign up for an account and download the VPN application compatible with your device's operating system. Most providers offer apps for Windows, macOS, iOS, Android, and even some routers.
Install and launch the VPN app: Follow the installation prompts to install the VPN app on your device. Once installed, launch the application and log in using the credentials you created during the sign-up process.
Connect to a server: Upon logging in, you'll typically be presented with a list of server locations to choose from. Select a server based on your preferences, such as geographic location or server load, and click connect.
Verify your connection: Once connected, verify that your internet traffic is being routed through the VPN by visiting a website like whatismyip.com to confirm your new IP address.
Customize settings (optional): Depending on your preferences, you may want to explore the VPN app's settings to customize features such as protocol selection, kill switch functionality, and auto-connect options.
By following these steps, you can set up a VPN quickly and easily, ensuring your online activities remain private and secure. Whether you're browsing the web, streaming content, or conducting sensitive transactions, a VPN offers peace of mind in an increasingly interconnected world.
Free
"Free" is a term that often draws attention and captivates interest. Whether it's about getting something without having to pay for it or simply enjoying a sense of liberation, the concept of "free" holds a special place in our hearts.
In today's world, the allure of getting things for free is undeniable. From free samples at the grocery store to free trials of software and services online, people are drawn to the idea of not having to spend any money to enjoy something new and exciting.
However, it's important to remember that not everything that is free comes without a cost. Oftentimes, there may be hidden fees or strings attached that could end up costing more in the long run. It's essential to read the fine print and understand the terms and conditions before diving into a free offer.
On the other hand, the feeling of freedom that comes with not being constrained by financial limitations is truly priceless. Whether it's taking a leisurely stroll in the park or pursuing a passion project without worrying about the expenses, the sense of liberation that "free" can bring is truly liberating.
In conclusion, the concept of "free" carries both excitement and caution. While it can open doors to new opportunities and experiences, it's essential to proceed with discernment and make informed decisions to truly enjoy the benefits of things that come without a price tag.
File management
File management is a crucial aspect of organizing and maintaining digital data efficiently. Whether you are a business professional, student, or average computer user, understanding the basics of file management can greatly enhance your productivity and workflow.
File management refers to the process of arranging, organizing, and storing digital files on a computer or other storage devices. This includes creating, naming, classifying, storing, retrieving, and deleting files as needed. A well-organized file management system ensures that files are easily accessible, secure, and less likely to be lost or misplaced.
There are several best practices to consider when it comes to file management. Firstly, it is important to establish a logical folder structure that reflects the content and purpose of the files. This helps in locating specific files quickly and efficiently. Additionally, using clear and descriptive file names can further aid in identifying the contents of a file without having to open it.
Regularly backing up important files is another essential aspect of file management. This ensures that data is not lost in the event of a computer malfunction or accidental deletion. Cloud storage services, external hard drives, and networked drives are popular options for backing up files securely.
Overall, mastering file management techniques can lead to a more organized digital workspace, increased productivity, and reduced stress. By following best practices and staying consistent in file organization, users can optimize their digital file management experience.
Android
Title: Exploring the Dynamic World of Android: A Comprehensive Overview
In the realm of mobile operating systems, Android stands out as a powerhouse, driving billions of devices worldwide. Developed by Google, Android has evolved from its inception in 2008 to become the leading platform for smartphones, tablets, wearables, and even automotive systems.
At its core, Android is built on the Linux kernel, offering a robust and secure foundation for a wide range of devices. One of its key strengths lies in its open-source nature, allowing manufacturers to customize and tailor the software to suit their hardware specifications. This flexibility has led to an expansive ecosystem of devices, offering diverse features and price points to cater to every user's needs.
One of the defining characteristics of Android is its vast array of apps available through the Google Play Store. From productivity tools to entertainment, there's an app for almost everything imaginable. The platform's developer-friendly nature has also fostered a vibrant community of app creators, continuously pushing the boundaries of innovation.
Android's user interface has evolved over the years, with each iteration introducing new features and design enhancements. From the early days of Gingerbread to the modern Material Design language, Google has focused on delivering a seamless and intuitive user experience across devices of all shapes and sizes.
Security is a top priority for Android, with regular updates and built-in features such as Google Play Protect helping to keep devices safe from malware and other threats. Additionally, features like biometric authentication and encryption ensure that user data remains secure.
Looking ahead, Android continues to innovate, with advancements in artificial intelligence, augmented reality, and foldable devices shaping the future of the platform. As technology evolves, Android remains at the forefront, driving innovation and empowering users worldwide.
0 notes
Text
es file explorer vpn
🔒🌍✨ Get 3 Months FREE VPN - Secure & Private Internet Access Worldwide! Click Here ✨🌍🔒
es file explorer vpn
ES File Explorer VPN integration
ES File Explorer, a versatile file management app for Android devices, has integrated VPN functionality, enhancing its utility for users concerned about online privacy and security.
With the integration of VPN (Virtual Private Network) capabilities, ES File Explorer now offers users the ability to browse the internet securely and anonymously directly from within the app. This feature enables users to encrypt their internet connection, safeguarding their data from potential threats such as hackers, trackers, and surveillance.
By using a VPN within ES File Explorer, users can access geo-restricted content, bypass internet censorship, and protect their online activities from prying eyes. Whether accessing sensitive information on public Wi-Fi networks or simply seeking to maintain privacy while browsing the web, the VPN integration enhances the overall security posture of the app.
Furthermore, ES File Explorer's VPN integration ensures ease of use, allowing users to seamlessly toggle the VPN on or off with just a few taps. This intuitive interface makes it simple for users to take control of their online privacy without the need for additional, separate VPN apps.
In addition to its file management capabilities, ES File Explorer now serves as a comprehensive solution for users seeking both efficient file organization and robust online security. By integrating VPN functionality, ES File Explorer reinforces its position as a trusted tool for managing files while prioritizing user privacy and security in an increasingly digital world.
ES File Explorer VPN setup
Setting up a VPN within ES File Explorer can be a convenient way to enhance your online security and privacy. By encrypting your internet connection, a VPN helps protect your data from potential cyber threats and privacy invasions. Below is a step-by-step guide on how to set up a VPN within ES File Explorer on your Android device:
Download and install a trusted VPN app from the Google Play Store.
Open ES File Explorer on your device.
Navigate to the "Network" tab at the bottom of the screen.
Click on the "Network" tab and select "Remote Manager."
Click on "Net Manager," then select "New" to add a new server connection.
Choose "FTP" as the server type and enter the VPN server address provided by your VPN service provider.
Enter your VPN username and password in the appropriate fields.
Check the "Anonymous Login" box if your VPN service does not require a username and password.
Click "OK" to save the VPN connection settings.
Now, you can browse the internet securely through the VPN connection within ES File Explorer.
Remember to connect to the VPN server each time you want to browse securely. Setting up a VPN within ES File Explorer adds an extra layer of protection to your online activities and helps safeguard your sensitive information from prying eyes.
ES File Explorer VPN compatibility
ES File Explorer is a popular file management app that allows users to navigate and organize files on their Android devices efficiently. Many users also rely on VPNs to protect their online privacy and access geo-restricted content. One common question that arises is whether ES File Explorer is compatible with VPN services.
The good news is that ES File Explorer is compatible with VPNs, allowing users to secure their internet connection while managing their files. By using a VPN in conjunction with ES File Explorer, users can browse through their files securely and anonymously, without worrying about their online activities being tracked or monitored.
When using ES File Explorer with a VPN, users can also access files from different locations around the world by connecting to servers in various countries. This can be particularly useful for users who need to access files stored on remote servers or for those who want to bypass geographical restrictions when accessing certain websites or online services.
In conclusion, ES File Explorer is indeed compatible with VPN services, offering users the flexibility to manage their files securely while ensuring their online privacy and anonymity. By combining the functionalities of ES File Explorer with a VPN, users can enjoy a seamless and protected file management experience on their Android devices.
ES File Explorer VPN configuration
Configuring a VPN within ES File Explorer can enhance your online privacy and security, allowing you to browse the internet anonymously and access geo-restricted content. Here’s a step-by-step guide to setting up a VPN in ES File Explorer:
Download and Install a VPN App: Start by downloading a reputable VPN app from the Google Play Store. Ensure that the VPN provider offers a dedicated app for Android devices.
Launch ES File Explorer: Once the VPN app is installed, open ES File Explorer on your Android device.
Access Network Settings: Navigate to the menu within ES File Explorer and select "Network" or "Network Settings."
Choose VPN: Look for the option to add or configure a VPN connection. Tap on it to proceed.
Add VPN Configuration: Select the option to add a new VPN configuration. You may be prompted to enter details such as the VPN protocol, server address, username, and password. These details can usually be found in the account settings provided by your VPN provider.
Save Settings: After entering the required information, save the VPN configuration settings within ES File Explorer.
Connect to VPN: Once the configuration is saved, return to the main screen of ES File Explorer and select the VPN connection you just created. Tap on it to connect.
Verify Connection: After a few moments, the VPN connection should be established. You can verify this by checking your device's status bar for the VPN icon or by visiting a website to confirm your new IP address.
Enjoy Secure Browsing: With the VPN successfully configured in ES File Explorer, you can now enjoy a secure and private browsing experience. Your internet traffic will be encrypted, protecting your data from prying eyes.
By following these simple steps, you can configure a VPN within ES File Explorer and enjoy enhanced privacy and security while browsing the web on your Android device.
ES File Explorer VPN features
ES File Explorer is a versatile file management app that also offers VPN features, allowing users to ensure their online privacy and security while browsing the internet. With ES File Explorer VPN, users can protect their sensitive data from potential cyber threats and access geo-restricted content with ease.
One of the key features of the ES File Explorer VPN is its strong encryption protocols, which safeguard user data by creating a secure tunnel for online communication. This encryption helps to prevent unauthorized access to personal information, ensuring that user privacy is maintained while using the VPN service.
Additionally, ES File Explorer VPN offers users the ability to browse the internet anonymously by masking their IP address. This feature is particularly useful for users who wish to access websites and content that may be restricted in their region, as it allows them to bypass these restrictions and browse the web freely.
Furthermore, ES File Explorer VPN provides high-speed connections, allowing users to stream content and download files quickly and efficiently. This ensures a seamless browsing experience without any lag or interruptions, making it ideal for users who engage in activities that require a stable internet connection.
In conclusion, ES File Explorer VPN is a reliable and user-friendly solution for users looking to enhance their online security and privacy. With its encryption protocols, anonymous browsing capabilities, and high-speed connections, ES File Explorer VPN offers a comprehensive package for users seeking a safe and unrestricted browsing experience.
0 notes
Text
How do I add a domain to my Webuzo panel?
Uff, that's a tough job tho, isn't it? Well, don't worry about why we are here and what's our job our job is ofcourse to solve your problem and to get away from the confusion. But wait, okay, I know you are in a hurry to know the effective step to add a domain to your Webuzo Panel, but you know what?
There is something you need to understand very well before diving into the effective step of how to addon a domain on your Webuzo Panel. Let's first understand what Webuzo is and how it works.
Webuzo
Webuzo is basically a comprehensive web hosting control panel, which comes with a user friendly interface to easily manage your server and the website. Webuzo always aims to simplify the task of the website administration to easily attract effective audience who has a diverse range of technical expertise. Webuzo comes with a intuitive interface helps to empower the users including those who dont have that much technical knowledge to effectively manage their website.
Well as we have now got an overview of the Webuzo lets now look into how to effectively add your domain to a Webuzo Panel step by step :
1. Login to Webuzo :
First of all you have to login to your login panel in a web browser and have to login with your credentials.
2. Navigate to the Domain Section:
Once you have logged in you need to look for a options like “Domain” or “Domain Manager” in the Webuzo Dashboard. Then click on it to access the Domain Management Section
3. Add a New Domain:
Then in the Domain Manager there will be a option given to Add the Domain. Click on the “Add Domain” option or similar to the button option.
4. Enter Your Domain Details:
Then do provide the necessary details about your domain, including your domain name, the domain root, and also the directory where you website file is been effectively stored, and also other relevant information and settings.
5. Configure DNS :
If the domain is not already pointed towards the server IP address then you need to update the DNS setting with your effective domain registrar. This typically involves setting the domain name servers or creating a records that do point your server to your IP address.
6. Save changes :
After effectively entering the details of your domain and effectively configuring your DNS, do save the changes done. Now you can effectively add your domain in the Webuzon Panel.
7. Upload Website Files :
Do upload your website files to the specified document root directory. You can take help of the FTP or also other file manager provided by Webuzo for this task.
8. Configure your Web server :
Depending on your own setup you need to configure your Web server (Apache, Ngix. etc.) to recognize the new domain and to effectively serve the Website. Webuzo is basically a one man army as itself handles it automatically, also do double check the server configuration if needed.
9. Test Your Server :
Last but not the least step one everything is setup properly do try to access your domain in a web browser to ensure that your website is working properly or not.
Conclusion
Do always keep in mind that some steps might vary depending on your version of Webuzo you are using. Do refer the the official Webuzo documentatio or contact their support for a detailed and version specific instructions.
Source
0 notes